Friday, January 21, 2011

2012 Calendar

Woohoo, I'm happy to say that my entry has made it to the finalist stage. Showed my critter’s right eye last time, so here’s the left. Guess I’d better sew that sleeve on now...

Update February 14: It’s in the calendar...so yay!

Saturday, January 8, 2011

Watercolor pencils on fabric

My first completed project this year is for the 2012 Quilting Arts Calendar... might as well try for three years in a row! The theme is Feeling Pet-ty, in other words animals, a lifelong favorite subject of mine. The previous entries had fairly bright colors but the subject this time called for a much more subdued palette. I had not used watercolor pencils on fabric before, but because they are transparent and the idea was to allow the patterning on the fabric to show through, wc pencils had potential.
First, a little organizing was in order. These pencils date from a book project eons ago and were scattered about in various nooks and crannies of my studio. After corraling them into a semblance of order, a coloring chart became essential because of the nature of wc pencils. It’s very hard to tell just looking at the pencil what color it really is.
As you can see on the left, the colors change drastically when water is added.

Because I was not going to use plain white fabric, the pencils would be interacting with the underlying color and/or pattern. The fabric needed to represent the fur of my critter, without getting literal, necessarily. Below are the four contenders:
The one on the left was a possibility, the next one was too spotty, the next one too contrasty... the one on the right with it’s pattern of leafy, woodsy imagery seemed most promising. So, I scribbled on some colors (below) and brushed over them over with water. So good so far, time to jump right in.
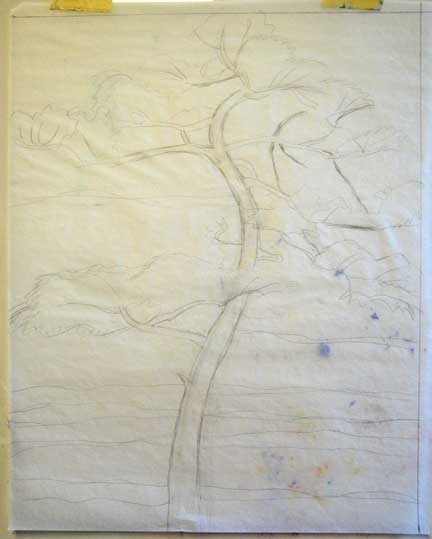
The sketch was done in Photoshop, won’t get into the details of that now. Once it was printed out, I redrew it onto tracing paper. Someone had asked me awhile ago about my unusual method of transferring sketches, so here are some photos. The tracing paper sketch is on top, and I just draw directly on the fabric underneath. The pencil point is visible through the tracing paper.
I roll back the tracing paper often to see how it’s looking.
Also, it’s easy to see through the tracing paper where the pencil is because it is darker.
This method isn’t suitable in every situation, but because I was using a dark wc pencil and a thick line, it worked fine. Why not use transfer paper such as Saral? I do on many occasions, but this works just as well for me and there are no worries about a Saral line ending up in the wrong place and being tough to remove. How about a light box? That’s a good option if the base material is see-through enough. But, if you’re transferring a sketch to primed canvas (for example), a light box won’t work.

Below is the colored line before and after being washed over with water. Quite a difference! You can always add additional layers of the pencil, if needed, after the fabric is dry. Or, you can use the pencil on wet fabric, which really lays down pigment but may be a tad less controlled. By the way, in this case the amount of water being added is just sufficient to melt the wc pencil, not saturate the surrounding area.
How about setting the wc pencil? I tried ironing it, which didn't seem to do anything much. A wet tissue dabbed onto the pencil work is an easy test of whether the pigment is set or not. Painting on thinned acrylic gel, textile medium, or Jacquard colorless extender (tutorial with wax pencils here) probably would have worked but since quite a bit of the image was involved, there was too much territory to cover. Instead, it was sprayed with two coats of Claybord matte fixative. This is the main fixative I use, because it has a relatively low odor that dissipates quickly. As you can see from the eye detail at the top of this post, there was another whole layer of stitching to add, so I didn’t want pigment from the pencils to get all over the threads or have to keep smelling a noxious odor. The other advantage is that is doesn’t stiffen the fabric much, if at all.

The watercolor pencils gave me the soft look I wanted, so that was the main thing. Wondering what this animal is? If it doesn’t get into the calendar, I’ll reveal all in a couple of months. If it does get in, I’ll post more about this project closer to the calendar’s release date.

Happy New Year, everyone!


Wednesday, December 1, 2010

Inspired Ideas: The Christmas Issue

Inspired Ideas is an online ezine I just found out about via Elizabeth Dulemba’s blog. It has 168 pages plus an appendix... click here to check it out:
It’s full of creative and unusual craft projects such as a Christmas village made of recycled cereal boxes, a yarn ball wreath, cookie cutter jewelry designed by a gallery of crafters, artists, and bloggers including Mary Engelbreit. The brainchild of Amy Powers, it is an impressive example of innovative publishing... and it’s free!

Happy browsing!


Saturday, November 27, 2010

Whimsical bird in progress

It’s been awhile since I’ve posted about the LIQ project but never fear, progress is being made ever so slowwwwly. Above is the rough sketch of the bird drawn in Photoshop for size and placement in the larger scene... the plan is to refine her when the bird is actually constructed. Sometimes I make a very precise sketch but in this case it seemed reasonable to wing it (pun intended.)
My original theory was that the bird would be some shade of blue with a red belly, but a dotted violet, orange paisley, and black on black fabrics ended up working out best. You have to keep an open mind! I first tried matching orange and violet points on the wings and tail, but didn’t quite look right.
The striped fabric seen above right had the violet and orange in it plus some other colors that added interest. For the legs (below), I wrapped gold ribbon around black rickrack. The feet are made of interfacing painted with gold metallic acrylic paint. This photo shows more of a bronze color, but the gold ended up working better.
After gluing on the points, I machine embroidered the wings and tail. They are attached at their bases, but left free on the tips to give more dimension. I had sewn the body to the quilted background with a machine zigzag stitch, then remembered there was supposed to be a “swish” behind the bird...oops!
So I ripped out part of the stitching, put the light blue swish under the body, then restitched it. Some simple free-motion-quilting was done on the body, a beak and bead eyeball was added, plus some beads along her belly.
She’s carrying a piece of fabric back to her nest, in case anyone is wondering.

Tuesday, October 26, 2010

Home at last

Here is how A Free Spirit (on the right) looks in his new home in New Zealand:
Love the two images together...many thanks to Julia Arden for sending this photo!
The previous posts about how this mini-quilt was made are here and here.


Wednesday, October 13, 2010

Pine in progress

I’ve been wanting to depict this pine tree on our street for a long time, so it’s nice to finally get going on it. The photo is a nice start but I’m going to leave out the distracting trees behind it and tweak the colors. 

Here is the sketch on tracing paper, not too detailed but gets the idea across:
I started with a plain piece of some generic white cotton fabric, then globbed a lot of acrylic paint onto a silicone-treated sheet, one of the ones made for ironing appliqué. I folded over the sheet a few times, added more paint, etc. then laid the white fabric on it and pressed down.
This is interesting, but is too dark and contrasty, so the next step (after letting it dry thoroughly) was to brush over some lighter, semi-opaque paint. I also added some metallic copper paint. This is more like it:
Here is a close-up of the painted background:
Acrylic gel was used to adhere the fabric to a stretched canvas, then it was allowed to dry. (Note: if I was going to go in a more quilty direction, I would skip that step.) Next I transferred the sketch by using my weird method of taping the sketch over the canvas and drawing underneath it onto the canvas with a watercolor pencil. Next, the outlines of the tree were painted on:
I plan to paint in some color then use a few if the collage papers shown in this post to complete the tree. But, we’ll see what actually happens!


Thursday, September 30, 2010

Tag Galaxy... a fabulous way to find images

Do you need reference photos and/or inspiration? The Tag Galaxy image search system has been around for a year or two, but I just heard about it. You enter a tag (i.e. search term) such as quilts and a solar system appears:
The main term quilt is on the Sun, while related terms such as fabric, sewing, and patchwork orbit around it. When you click on the Sun, images start flying in from all sides:
The images are photographs coming from Flicker that have been tagged with the word quilt, apparently. Once they have arranged themselves into a sphere...
 you can rotate it up, down, and around to see the images on all sides. If you want to zoom in on one photo, just click on it...
 ...and it enlarges. The web site is animated with Flash, so this post gives just a hint of how cool it is. Try it and be mesmerized!

I almost forgot to mention where I heard about this, on the Teach Science and Math blog...many thanks to David Wetzel. There are several other image search engines mentioned in his post, so you may want to check those out, too.