Showing posts with label organizing tips. Show all posts

Friday, December 4, 2009

My inspiration book

Like many artists, I keep images for reference and creative stimulation. One way of doing it is to keep a clip file, which consists of tossing the photos, drawings, etc. into a file folder. Though that works for some very specific projects, for my general collection of mostly catalog and magazine images, a more organized arrangement is more, well... inspiring!

A large binder with page protectors is the basic book. The images are pasted on paper with a glue stick on both sides, then into the page protectors they go. The binder is divided into categories using standard tab dividers. Below are some pages from the Fabric section. While these are clothes, I‘m primarily interested in the color combinations and the patterning on the cloth.
There’s a Jewelry section and a separate Bead section. Every time I look at these, I want to make one.
There’s a Knit & Crochet section, Ceramics, 2-D Art, and several more categories. Hey, at least all these ridiculous catalogs they send me get some use! (I have cut down on the onslaught by registering with CatalogChoice.org, which has helped. It’s an endless battle, though.)
The book is getting pretty full, may have to subdivide. Of course there’s a whole digital clip file on my computer that is getting vaster by the day. Then there are the bookmarked web pages, the blog subscriptions, my bookshelves, the library books...

Friday, November 27, 2009

Organize embellishments on your design wall

Usually a design wall is for putting together a quilt top. I just finished stitching a few myself, The 4 Tops. However, I’m getting ready to work on the LIQ project, a series of small wall hangings. Since I won’t be needing the entire design wall for awhile, a section of it is going to become a storage station for threads, buttons, lace, trims, and whatever else needs to be handy yet out of the way. The stuff is hung on various sizes of pins, depending on how thick each item is.

Perhaps you have the same affliction that I do... out of sight, out of mind. If these goodies are ever going to be utilized, I have to be able to see them! Just having them arranged like this makes me want to get going on the next wall hanging. When I first did some hand embroidery as a kid, the threads ended up as a tangled mess in a box. Hmmm... it’s probably still around here somewhere...
A post that includes how the design wall was made is here. Another way to use this concept is to get a piece of 1/2 inch foam core. Michael’s and Sam Flax are two stores that carry it. You could use it as a small portable storage wall, though knocking it over would be a potential hazard.
Believe it or not, all the doodads shown above were jammed into this cutlery organizer (from Bed, Bath, and Beyond.) It was impossible to find anything as you can imagine. This is what’s left in there for the moment, though it’s sure to be filled up again soon.
I’d be interested in hearing about other interesting storage or organizing tips, heaven knows there are still stashes of stuff piled up that need a better home.

Saturday, October 3, 2009

Welcome to my sewing studio tour!

The funny thing is that when I set up this room five years ago, the quilting bug had barely bitten. I just wanted a room to work on whatever craft was interesting at the moment. The room was needed as a guest room occasionally, so versatility and things-that-can-be-rearranged were important.

After painting the ceiling to cover the footprints of the previous owners’ bunk-bedded twin boys, scraping off the kiddie wallpaper border, and painting the walls a soft sage, it was time to get some furnishings. The futon was one of the first acquisitions. (It’s only full size so it’s really a tad small for two. Oh well!) I heard about various DIY design walls on the Quiltart list, so below is my portable one.
It consists of two 4' X 8' panels of insulation foam, with about a foot cut off the length so they fit easily in the room. They are covered with gray felt from Jo-Ann’s that comes in 6 foot widths. The felt is wrapped around to the back and pinned at an angle towards the outer edges. This is mostly because the pin tips would otherwise stick out the front... not good. The felt has held up well, though the cat has made use of it for unauthorized scratching a few times. Chunks of fabric cling to it beautifully for designing purposes. It’s also handy to hang small supplies on a pin like embroidery floss for certain projects. If necessary, the panels can be easily moved.
When a project is underway, I set up an ironing board with a wide surface on top. It can be adjusted in height for sitting or standing. The wide board is a sheet of homasote covered with ironing board fabric on one side, and flannel on the back. The flannel keeps it from sliding. Homasote seems to be a variable product, because some people say they can stick pins in it easily. Well, not this stuff! But it is a good surface for ironing.
The area shown below is an assembly of flat files, countertop, and wall cabinets. There are actually four flat file units. The lower ones have 5 drawers, then stacked on top are 3-drawer units. I ordered them from a local art supply place. They were only available unfinished, so first they required three coats of clear satin polyurethane. The handles were flimsy plastic, so I ordered unfinished wooden handles from a woodworking supply place, stained and varnished them. (I hate sanding, varnishing, sanding, blah, blah, but love the end result.) The little metal label holders were spray painted a copper color to cover the original shiny brass. The wall cabinets were off-the-rack, already assembled cabinets from Lowe’s. Fortunately their color was close enough to the flat files. I added the knobs.

The countertop was custom made (big box home supply store) to be as long as possible yet still fit in the room. It’s just sitting on top, it’s not screwed down to the flat files. All these pieces could be taken out and the room turned into a plain bedroom in the future, if needed. The bulletin board under the cabinets is made from homasote covered with a thin veneer of cork. Though difficult to push tacks and pins into, it works reasonably well and certainly takes advantage of the space. The little white 3-drawer unit to the right of the sewing machine holds my larger spools of thread. The green pad is for the comfort of my kitty Knickers as she gazes out the window, or more likely, snoozes.
As previously mentioned, I originally didn’t know what was going to go into these flat files. Not surprisingly, they are now jammed with fabric, mostly fat quarters. The nice thing about a flat file drawer is how it can be left open while working. For example, the 4th drawer down has the smaller thread spools, needles, bobbins, etc. in it for easy access while sewing.
These drawers are on the right of the sewing machine. Love to just open them up and look at all the colors and patterns!
Across the room is this bookcase filled with most of my quilting books and mags. In order to fit it there, the bi-fold closet doors were removed and a curtain hung instead. The closet has filing cabinets and shelves full of batting, fabric, etc. The table is covered with fabric for a particular project. Rather than constantly dig through the file drawers, I pulled out all the geometric and small prints and put the fat quarters into photo boxes. The bigger cuts are sort of piling up, but I don’t really need any more fabric, need to just get working(!) Those little nested tables come in handy to move around and pile things on mid-project. Or, if guests are in the room, to put next to the futon.
So there you have it! In the interest of full disclosure, I must admit to moving aside a pile or two of clutter to take these photographs. When I’m in the middle of making something, the room gets... shall we say... messier.


Tuesday, September 29, 2009

Open Studios coming on Saturday!

This is a fun idea from Quilting Arts magazine... their Fall Studios issue features tips for hosting an open house in your studio. In conjunction with this theme, they’re sponsoring a virtual tour of studios on blogs, including this one. I’ll post photos of my sewing room on Saturday, October 3rd. If you’d like to participate, click here. It’s easy to do.

This was a timely idea for me, since I had been thinking of showing some photos of my quilting lair anyway, including the design wall and storage solutions that have worked for me. The question is, do I tidy it up first or not?


Thursday, August 27, 2009

Studio reorganization... is it permanent or just a short-lived phase?

After delaying for years I finally bought a new monitor and Mac, so yahoo! However, as this photograph demonstrates, some reorganization was in order as well. The room isn’t quite this disheveled normally, but the photo was taken after the new system was in place, yet the old system (G4 tower, a small LCD monitor, and a Sony Trinitron CRT) was still on the tables. It’s still in here actually, because I keep thinking of files that must be retrieved from it.

I asked my naturally-organized hubby Andy for advice on how to improve the use of space. After chuckling because he gets this request from people at work fairly often, he immediately came up with two great suggestions:
#1 Put some shelves behind the monitor.
#2 Get a larger bulletin board.
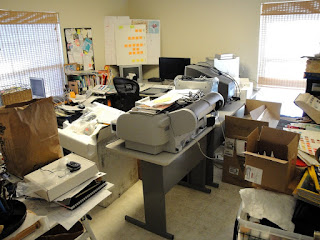
The white boards on top of the TV are pieces of foam core that were sort of propped up there... for years. Kind of like bulletin boards, come to think of it. When stuff accumulates in sort of a permanent geological formation, it’s either a sign that a storage unit is needed, or perhaps that the stuff needs to be discarded. It’s not obvious in these photos, but the other items that have an annoying way of piling up are sticky notes. They accumulate in my office-studio like barnacles on a gray whale.
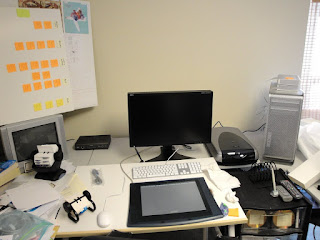
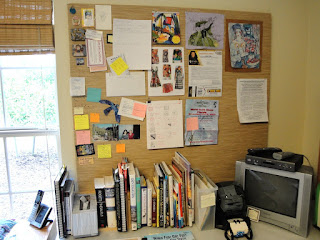
Let’s start with the new bulletin board (below). It’s a lot bigger than the old one, 4' X 4' and it’s very easy and inexpensive to make. It’s a piece of rigid foam insulation from the building supply store cut in half because it comes in 4' X 8' sheets. The other half is elsewhere in the room giving a total of 32 square feet of wall space to put stuff. Note: take your own box-cutter to the store, one with a nice blade at least an inch long. They only give the employees a dinky little cutter with a teensy tiny blade that just scratches the surface, literally.

The foam is covered by inexpensive decorator fabric from an outlet that is wrapped around the back and pinned into place with ball-headed straight pins. They're angled in pointing towards the edges to keep them from poking through. The pins work well instead of thumbtacks, which would make bigger holes and tend to degrade the foam faster. I didn’t bother to attach the finished bulletin boards to the walls... this one is sitting on the tables and is held in place by the mini-bookcase and TV. If you wanted to attach it to the walls, you’d probably have to glue some chunks of thin plywood to the back because you can’t hang foam on a nail. For long.
With this much-thinner monitor (a NEC MultiSync LCD 2490WUXi), there was a huge amount of room behind it. After visiting the local office supply stores, I found this 3 X 3 cubicle in Target. It’s not the most sturdy chipboard in the world... it’s similar to dried oatmeal. However, because the shelves are supported every 12 inches, it shouldn’t have any sagging problems, hopefully. It was a little confusing to assemble, but eventually it came together. This gives me an additional 9 square feet of stashing space that so far is mostly empty(!) The plastic bins are from Office Max... they were the only place that had anything like these.
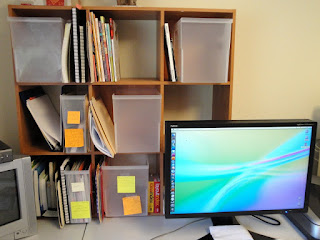
You can see some sticky notes have crept in already, but I’m forcing myself to use the sticky note “widget” on the Mac instead of the real ones as often as possible. Or, just starting a document to contain whatever the fab info is. I should probably take the pens and pencils away, that might help.
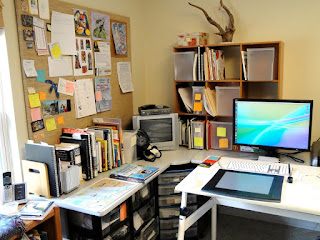
Anyhoo, it’s a vast improvement and makes it much more enjoyable to write, illustrate, design, go online, you name it. Maintaining this nirvana is the next trick. After I finish up the rest of the room...